

CSS Selectors: A Beginner's Guide
Learn about the basic types of CSS selectors and how they are applied.


Introduction
Hello everyone, welcome back to my blog! In this article, I'll cover the different types of selectors in CSS and how to use them.
How CSS Works With HTML
Before explaining the different types of selectors, I must explain to you how CSS works with HTML. Let's say you want to create a stylish website with all the bells and whistles. You want a fancy background, images and all of your favorite colors on your website.
We know that HTML is the bones of your website, where you'll display most of your content like text. But how will you add images, colors and other things that'll enhance the visual aspect of your website? This is where CSS comes in.
You can add CSS to HTML to enhance your website's appearance. However, in order for CSS to work seamlessly with HTML, we must use something called a selector and apply it to an HTML element.
Basic CSS Syntax

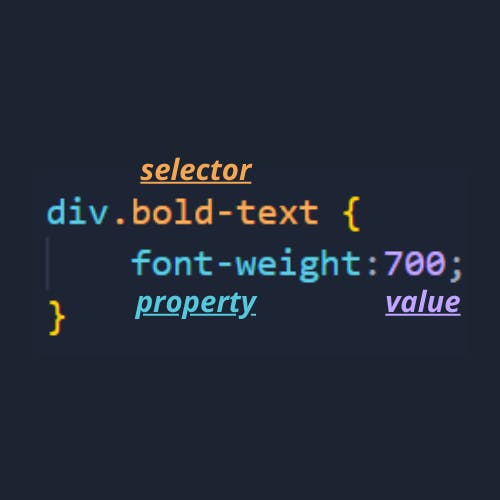
As explained before, CSS is just a bunch of rules determining what styles you want to apply to elements on a webpage. These rules consist of three parts: a selector, a property and a value. Here is a visual picture of what a simple CSS declaration looks like:
In order for selectors to work, they generally must have three things.
- A matching CSS class selector in the stylesheet.
- A class attribute of the specific HTML element.
- A declaration specifying how a specific HTML element should be styled.
If you want to apply a specific style to your website, it's helpful to know what properties and values are when dealing with selectors. Properties dictate which styling characteristics will be applied. Every property has values that you set to alter that specific property.
Fortunately, there are different ways to call a selector in CSS, which you'll find down below.
Types of CSS Selectors
 Below, you'll find the four basic type of selectors that you'll use as a web developer.
1) Class Selectors
A class selector selects elements with a class attribute. To select elements with a class selector, you can write a period followed by the name of the class.
SYNTAX: .classname {properties: values;}
<!--index.html-->
<div class="red-text">
     Click down below.
</div>

<h1 class="red-text">
     Welcome!
</h1>
/*style.css*/
.red-text {
     color: red;
}
As shown in the example above, you can use the same class selector as many times as you want on different elements.
2) ID Selectors
You can use ID selectors to identify a single element. They are defined by a hashtag followed by the name of the ID. Unlike class selectors, ID selectors can only be applied once in an HTML page.
SYNTAX: #idname {properties: values;}
<!--index.html-->
<p id="alt">This is a sentence.</p>
/*style.css*/
#alt {
  color: blue;
  text-align: center;
  font-size: 40px;
}
3) Universal Selectors
The universal selector matches all elements in the HTML document. It is represented by an asterisk.
SYNTAX: *{properties: values}
<!--index.html-->
<ul>Sports
<li>Basketball</li>
<li>Football</li>
<li>Baseball</li>
</ul>
/*style.css*/
* {
font-weight: bold;
font-size: 42px;
}
4) Type Selectors
The type selector matches all elements that belong to the specified type. For example, suppose you want to have a red background for your webpage. Look at the example below.
SYNTAX: element type {properties: values}
<!--index.html-->
<body>
<h1>Hello, welcome to my portfolio.</h1>
<p>My name's Kahlei!</p>
<h2>Work</h2>
<p>Look down below to see all of my work.</p>
</body>
/*style.css*/
 body {
   color-background: red;
}

h1, h2 {
  color: blue;
  color-background: white;
  font-weight: bold;
}
Other Tips to Use Selectors
One important thing to know about selectors is that you're able to group them. In the example above, the “h1” and “h2” selectors are separated by a comma, followed by properties encased in brackets.
If you want multiple elements to have the same properties, you can group selectors instead of manually writing a declaration for each element.
Other than grouping selectors, we can also nest selectors.
<!--index.html-->
<p>This paragraph is outside of my-div.<p>
<div id="my-div">
  <p>This is a paragraph of text inside my-div.<p>
  <p>This is another paragraph of text inside my-div.<p>
</div>
/*style.css*/
#my-div p {
  color: red;
  font-size: 30px;
}
The example above shows a descendant combinator, which is defined by writing two selectors separated by one space. A combinator applies style rules to elements based on their parent or sibling elements. The descendant combinator “#my-div” applies the rules to all paragraph elements nested within the “div” element.
Lastly, we are able to chain selectors in CSS. Chaining selectors tells CSS that you would like the browser to grab a specific element. To chain selectors, you place them together, without any spaces.
In the example below, the browser applies the CSS rule to all paragraph elements with the “first-level” class.
p.first-level {
  color: red;
}
CSS Specificity
In order to fully understand class selectors, you must understand what specificity is in CSS. According to the MDN Web Docs, specificity “is the means by which browsers decide which CSS property values are the most relevant to an element and, therefore, will be applied.”
In short, a CSS declaration that is more specific will take precedence over ones that are less specific. Fortunately, there is a hierarchy to determine the specificity of each selector:
- Inline Styles (most specific)
- ID selectors
- Class selectors
- Type selectors
- Universal selectors (less specific)
Inline styles have the highest specificity, ID selectors will always have higher specificity than any number of class selectors and a class selector will always have higher specificity than any number of type selectors. Since universal selectors apply styles across all elements, they have no specificity.
Let's look at the example below to see how specificity works:
/*example one*/
.blue {
  color: blue;
}

/* example two */
#red {
  color: red;
}
The two examples above shows a class selector and an ID selector. However, the second example has a higher specificity since it is an ID selector.
When no value is specified on an element, the element inherits the declaration of the parent element.
Here is an example of inheritance:
<!--index.html-->
<p>This paragraph has <em>emphasized text</em> in it.</p>
/*style.css*/
p {
 color: green;
}
The words between the “em” tag will inherit the color property from the “p” element.
However, what if you have multiple rules targeting an element? CSS prioritizes the rule that was last defined.
Look at the example below:
<h1 class="burn change">Let us go to the park.</h1>
/* style.css */

.burn {
  color: green;
}

.change {
  color: brown;
}
As shown in the example above, the “h1” element has both the “burn” and “change” classes. CSS will run through every hierarchical factor, including specificity and inheritance.
If there is no factor that determines which rule to apply, the last defined rule gets applied to the element. The “change” class will be applied to the “h1” element.
Conclusion
Thanks for reading my article! If you enjoyed it, don't forget to give it a like and share.👍🙏
If you have any questions, this is the quickest place to reach me.
Follow me on 👉👉👉
✨Twitter: @kahsmit
✨LinkedIn: @kahleismith
✨GitHub: @mrkoderr
Finally, if you haven't already, follow me on Hashnode if you're interested in topics like
-🌐Web development (HTML, CSS, JavaScript etc.)
-🔗Blockchain
-🖥Crypto
-💎Web 3.0
-⚡all things tech
If you're not already on Hashnode, you can create an account here. 👈👈👈